Our Blog


Shin Splints Massage Tool: The Ultimate Guide to Pain Relief & Prevention

Using a good Shin Splints Massage Tool makes runing and other exercise fun again!

Key Takeaways

  • Shin splints, also known as tibial stress syndrome, cause shin pain due to tight connective tissues, overuse, or poor biomechanics.
  • The Mobilization Magic™ shin splints massage tool provides deep tissue massage to release trigger points and fascial adhesions.
  • Regular use enhances blood flow, reduces buildup of scar tissue, and supports faster recovery time.
  • Incorporating sports massage and remedial massage techniques can improve shin splint pain relief.
  • Prevention strategies include proper footwear, exercise modification, and massage for shin splints.

Understanding Shin Splints: Causes & Symptoms

Shin splints, medically known as medial tibial stress syndrome, are a common condition that affects runners, tennis players, and military recruits. They occur when excessive stress is placed on the shin bones, calf muscles, and surrounding connective tissues. This often results in inflammation, pain, and a buildup of scar tissue.

Common Causes of Shin Splints

  • Repetitive activity such as running, jumping, or high-impact sports.
  • Tight Fascia that surrounds the  shin muscles, tight calf muscles, or poor biomechanics.
  • Training on uneven surfaces or hard ground.
  • Wearing unsupportive footwear leading to excessive stress on the tibia bone.
  • Inadequate recovery time between intense workouts.

Symptoms of Shin Splints

  • A deep aching pain along the shin bone.
  • Tenderness, swelling, or tightness in the lower leg.
  • Pain that worsens with exercise but may subside with rest.
  • Burning or throbbing pain that affects daily activities.

🔗 Want to learn more about the causes and treatments of shin splints?
Check out this detailed guide on Shin Splints: Causes, Symptoms, and Treatment from Healthline.

How the Mobilization Magic™ Massage Tool Helps

The Mobilization Magic™ shin splints massage tool is designed to provide deep pain relief by applying sustained pressure to the shin muscles. This method loosens tight fascia, improves circulation of blood, and promotes faster recovery.

Key Benefits of the Shin Splints Massage Tool

✔️ Releases tight fascia to improve flexibility and range of motion.
✔️ Enhances blood flow for better oxygenation, healing and pain reduction.
✔️ Breaks down scar tissue that forms due to overuse injuries.
✔️ Supports muscle recovery and prevents further injury.
✔️ Mimics professional deep tissue massage for effective self-treatment.

Tricep Video capture

How to Use the Shin Splints Massage Tool for Maximum Relief

Step-by-Step Guide

  1. Prepare Your Muscles
    • Apply a heat pack or take a hot bath before using the tool to improve muscle elasticity.
  2. Position the Tool Correctly
    • Place the short option of the massage tool under the affected shin muscles.
    • If needed, place a towel over the tool to adjust the massage pressure.
  3. Apply Pressure Gradually
    • Start by resting your shin muscles on the tool for 1-2 minutes.
    • Slowly increase the duration up to 15-30 minutes per session.
    • Adjust the pressure by rocking forwards and backwards to target deeper muscles.
  4. Use Sideways Stretching for Maximum Effectiveness
    • Rotate your foot to one side and move your body in the same direction.
    • This motion helps stretch the connective tissues in a unique way that traditional methods cannot.
  5. Post-Massage Stretching
    • Follow up with calf stretches and static stretching to maintain shin muscle flexibility.

Cautionary Notes

❗ If you experience pins and needles, numbness, or discomfort, reposition the tool.
❗ Avoid using the tool on bone tissue—focus on muscle and fascia release.

Preventing Shin Splints: Best Practices

To avoid shin splint pain, incorporate these preventive measures into your training program:

Wear Proper Footwear

  • Use arch-supporting shoes to reduce impact on the tibia bone.

Modify Your Exercise Routine

  • Reduce high-impact activities and alternate exercises like cycling or swimming.

Strengthen Your Leg Muscles

  • Perform calf raises, ankle mobility exercises, and shin-strengthening drills.

Use Sports Massage & Trigger Point Therapy

  • Incorporate massage treatments to release tight muscles and improve blood vessels circulation.

Avoid Sudden Increases in Training Intensity

  • Increase workout load gradually to prevent connective tissue injuries.

Frequently Asked Questions (FAQs)

1. How often should I use the shin splints massage tool?

For best results, use the Mobilization Magic™ massage tool 3-5 times per week for 15-30 minutes per session. Regular use helps break down fascial adhesions and promotes shin splint pain relief.

2. Can deep tissue massage help with shin splints?

Yes! Deep tissue massage techniques, such as trigger point therapy and remedial massage, target tight fascia and muscle adhesions. This improves blood flow and accelerates the healing process.

3. Is the shin splints massage tool suitable for all fitness levels?

Absolutely! The tool is designed for athletes, runners, and active individuals looking for effective shin pain relief. It is also great for general recovery and muscle maintenance.

4. How does massage improve shin splints recovery time?

Massage stimulates the circulation of blood, reduces the buildup of scar tissue, and promotes tissue repair. This leads to faster recovery time and a lower risk of shin splints recurrence.

5. Can this tool help with compartment syndrome?

While the massage tool can release tight fascia, those with compartment syndrome should consult a massage therapist or healthcare professional before use.

Final Thoughts: Take Control of Your Shin Pain

By incorporating the Mobilization Magic™ shin splints massage tool into your recovery routine, you can effectively manage shin pain, improve muscle flexibility, and reduce the risk of shin splints. Whether you’re a runner, gym enthusiast, or athlete, this tool provides an effective option for long-term pain relief.

👉 Get Your Own Mobilization Magic™ Massage Tool Today!

🔗 Shop Now


How to Relieve Glute and Piriformis Pain at Home

Are you struggling with buttock pain, leg pain, or persistent symptoms of piriformis syndrome? The Mobilization Magic™ Tool offers an effective solution designed for self-treatment. This tool relieves discomfort caused by sciatic nerve compression, gluteal syndrome, or tension in the pelvic surface and surrounding fascia. Whether you’re a bicycle rider, experiencing hip pain, or managing muscle weakness, muscle strain, or prolonged periods of inactivity, this tool empowers you to take control of your recovery independently.

Piriformi- Glutei Video capture

Why Glute and Piriformis Pain Happens

Pain in the gluteal and buttock regions is a common symptom of piriformis syndrome or gluteal syndrome, conditions where the piriformis muscle spasms or tightens. This often irritates the sciatic nerve, leading to sciatica-like pain, dull aches, and tightness in the hip region.

Key Causes:

  • Direct trauma or repetitive trauma to the pelvic bone or hip bone.
  • Sitting in a slumped position or on uneven surfaces for prolonged periods, resulting in stiffness and muscle spasms.
  • Muscle weakness or imbalances in the hip muscles, hip abductors, or hamstring muscles, contributing to strain and discomfort.
  • Muscle strain and tight fascia compressing the sciatic nerve, often exacerbated by physical activities or periods of inactivity.

These issues may make everyday tasks difficult, but the Mobilization Magic™ Tool is specifically designed to target these problems, providing non-invasive relief at home.

Caution: If you feel pins and needles, numbness, move the tool to another spot.

blank

How to Use the Mobilization Magic™ Tool

The Mobilization Magic™ Tool is user-friendly, making it easy to integrate into your self-care routine. Follow these steps for optimal relief:

  1. Position the Tool: Start with the short option and place the tool under the problem area, such as the buttocks region, pelvic surface, or hamstring muscles.
  2. Apply Manual Pressure: Use your body weight to rock side-to-side, applying direct pressure to release tight fascia and tension.
  3. Gradual Increase: Begin with 1–2 minutes per session and gradually increase to 15–30 minutes, multiple times per week, based on your comfort level.
  4. Relax the Muscles: Use a heating pad or cold pack before or after sessions to relax tight fascia, reduce inflammation, and improve results.
  5. Stretch and Strengthen: Complement tool use with daily stretching, hip movements, and hip muscle strengthening exercises to maximise recovery and prevent future issues.

Piriformis syndrome

Piriformis syndrome is a condition in which the piriformis muscle, located in the buttock region, spasms and causes buttock pain. The piriformis muscle can also irritate the nearby sciatic nerve and cause pain, numbness and tingling along the back of the leg and into the foot (similar to sciatic pain).The piriformis muscle lies underneath the gluteus muscle, or buttock. When your glutes and piriformis are tight and fatigued they can cause you to have a sore lower back and hamstrings, poor balance, and even shooting nerve pain down your leg due to sciatica. Your sciatic nerve passes through your piriformis and so tension on it causes symptoms like sciatica.

Doing it whilst watching TV or doing other things like reading or working on the laptop makes the time pass quickly. A warm muscle stretches much quicker than a cold one so using a hot pack or having hot bath helps a lot.

Use the Short option in the buttock area

Benefits of Self-Treatment

  1. Cost-Effective: Avoid expensive physical therapy, muscle relaxants, or invasive treatment options like surgery.
  2. Convenient: Relieve buttock pain, hip pain, leg pain, or tension caused by sciatic nerve compression without leaving home.
  3. Empowering: Take charge of your recovery by managing persistent symptoms, muscle strain, and muscle spasms independently.
  4. Comprehensive Relief: Address tightness in the gluteal regions, hip muscles, and hamstring muscles caused by prolonged periods of inactivity or physical strain.

Preventive Measures and Maintenance

While the Mobilization Magic™ Tool provides effective relief, incorporating preventive measures into your routine can help avoid recurring pain and improve long-term results.

Tips for Prevention:

  1. Daily Stretching: Focus on stretches for the hamstring muscles, hip abductors, and gluteal regions to improve flexibility and prevent tight fascia from compressing the sciatic nerve.
  2. Strengthen Hip Muscles: Include hip muscle strengthening exercises to support the pelvic bone and buttocks region, reducing strain and improving posture.
  3. Adjust Activities: If you’re a bicycle rider or perform repetitive physical activities, take breaks to avoid overworking the pelvic surface and hip joints.
  4. Posture and Recovery: Minimise prolonged periods of sitting or lying in a supine position, especially on uneven surfaces, to reduce strain on the buttocks region and gluteal muscles.
  5. Heat and Cold Therapy: Use a heating pad to relax muscles or a cold pack to reduce inflammation and aid recovery after physical activities or tool sessions.


Watch: Relieving Glute and Piriformis Pain with Mobilization Magic™

For a practical demonstration on alleviating glute and piriformis discomfort, check out this video:

Mobilization Magic: How to Fix Tight, Painful Muscles and Joints

This tutorial provides step-by-step guidance on using the Mobilization Magic™ Tool to effectively target and relieve muscle tightness and joint pain in the gluteal and piriformis regions.

FAQs: How to Use the Mobilization Magic™ Tool

Q1: How does the Mobilization Magic™ Tool work for piriformis pain?
The tool uses manual pressure to release tight fascia and muscles in the buttocks region, gluteal regions, and pelvic surface. By targeting tension points with sustained pressure using your body weight, it improves blood flow, reduces sciatic nerve compression, and alleviates symptoms like sciatica-like pain. This makes it an ideal solution for treating gluteal syndrome and piriformis syndrome independently.

Q2: How long should I use the tool per session?
Start with short sessions of 1–2 minutes and gradually increase to 15–30 minutes as you become comfortable. Consistent use multiple times a week is key to achieving long-term relief. Pairing the tool with daily stretching and hip muscle strengthening exercises can prevent muscle strain and spasms while improving overall mobility.

Q3: Can the tool replace muscle relaxants or therapy?
Yes, the Mobilization Magic™ Tool offers a non-invasive alternative to muscle relaxants and therapy. It empowers you to manage symptoms such as buttock pain, hip pain, leg pain, and muscle weakness without relying on costly interventions or medications.

Q4: Is this tool effective for gluteal syndrome and sciatica?
Absolutely. The tool targets areas of tension in the gluteal regions, buttocks region, and split piriformis muscle to relieve sciatic nerve compression and restore mobility. It’s a practical and efficient solution for addressing gluteal syndrome, sciatica, and related issues like muscle spasms and tight fascia.

Q5: What symptoms and conditions can this tool address?
The Mobilization Magic™ Tool helps relieve persistent symptoms such as buttock pain, hip pain, leg pain, and tightness in the pelvic surface, hip bone, and hamstring muscles. It’s especially useful for managing discomfort caused by uneven surfaces, prolonged periods of inactivity, or physical activities like cycling.

Q6: Can the tool be used daily?
Yes! Daily use is safe and highly effective when used appropriately. Pair daily sessions with stretching, hip movements, and heat or cold therapy using a heating pad or cold pack for enhanced recovery and to prevent stiffness caused by prolonged periods of inactivity.


Lifestyle Tips for Faster Recovery

  • Daily Stretching: Perform stretches for the hip abductors, hamstring muscles, and buttocks region to improve mobility and flexibility.
  • Physical Activities: Incorporate low-impact exercises to maintain strength in the hip muscles, gluteal regions, and pelvic surface.
  • Heat and Cold Therapy: Alternate between a heating pad and cold pack to reduce inflammation and relax muscles before or after tool sessions.
  • Good Posture: Avoid slouching or sitting on uneven surfaces to minimise strain on the pelvic bone, hip joints, and gluteal muscles.

Ready to Relieve Your Pain? Get the Mobilization Magic™ Tool Now!


BUY NOW


You can stretch the muscle sideways which is a unique feature of the Mobilization Magic™ hamstring massage tool by rolling your leg left or right until the side of the muscle is on the hamstring massage tool this helps stretch the fascial skeleton of the muscle.


Understanding Groin Strains and Muscle Injuries

A groin strain is a common injury affecting the adductor muscles (inner thigh muscles), which are essential for leg motion, balance, and flexibility. These muscle fibers can become overstretched or torn due to sudden movements, intense activity, or forceful movement. This often happens during sports, lifting heavy objects, or improper stretching techniques.

Types of Groin Strains

Groin strains are categorized based on their severity and recovery time:

  • Mild strain – A small tear in the adductor longus muscle, causing minor discomfort but no severe pain.
  • Moderate groin strain – A partial tear leading to sharp pain, stiffness, and difficulty in normal activities.
  • Severe groin strain – A complete muscle tear resulting in intense pain, muscle weakness, and inability to perform athletic activities.

What Causes a Groin Muscle Strain?

Groin injuries are common in:
✔ Athletes who engage in quick movements, such as sprinting, jumping, or rapid direction changes.
✔ Individuals lifting heavy objects without proper technique.
✔ People with muscle imbalances, which increase strain on the groin and thigh muscles.
✔ Those recovering from previous groin injuries, as weakened muscle fibers are more prone to re-injury.

blank

blank

Symptoms of a Groin Strain

A groin injury can cause a variety of symptoms, including:

✔ Sharp pain at the moment of injury (a sudden pulling sensation in the groin muscle).
✔ Swelling and bruising in the thigh muscles, groin, and upper thighs.
✔ Muscle spasms and stiffness, reducing range of motion.
✔ Severe groin pain when walking, running, or engaging in physical activity.
✔ Pain worsening with flexibility exercises or hip adductor movements.
✔ Difficulty in normal movement, making everyday activities painful.

If left untreated, groin muscle strains can lead to chronic pain and longer recovery time.

How the Mobilization Magic™ Tool Helps with Groin Muscle Strains

What Does the Tool Do?

The Mobilization Magic™ IASTM tool is a highly effective groin muscle strain treatment device that relieves tight fascia (connective tissue), improves mobility, and accelerates muscle recovery.

✔ Breaks down tight fascia – The tool releases soft tissue restrictions, improving leg motion and muscle flexibility.
✔ Boosts circulation – Increasing blood flow helps deliver oxygen and nutrients to the affected muscle fibers, speeding up recovery time.
✔ Relieves muscle spasms and stiffness – Deep-pressure therapy helps relax tense muscles, reducing severe pain and discomfort.
✔ Prevents muscle imbalances – Promotes better muscle alignment, reducing the risk of future groin injuries.

This tool is designed to support physical therapy, sports rehabilitation, and everyday recovery.

How to Use the IASTM Tool for Groin Muscle Strain Treatment

Step-by-Step Guide

1️⃣ Positioning – Lie face down with the tool placed under the groin of the affected leg.

2️⃣ Finding the Right Spot – Move your leg outward and bend the knee to position the tool over the tightest or most painful area.

3️⃣ Applying Pressure:

  • Start with gentle movement to help your body adjust.
  • Hold the position for one minute, then gradually increase the time if tolerated.
  • For best treatment results, aim for 30-minute sessions, multiple times per week.

4️⃣ Stretching While Using the Tool – Rotate your foot outward and shift your body slightly to stretch the adductor muscles and hip flexors.

5️⃣ Use Heat or Ice Packs – Applying a warm pack before treatment relaxes muscles and soft tissue, while ice packs afterward help reduce inflammation and pain.

6️⃣ Avoid Nerve Compression – If you experience numbness, tingling, or sharp stabs of pain, adjust the tool’s position to avoid excess nerve pressure.

💡 Tip: Using this tool while watching TV, reading, or relaxing makes it easier to stay consistent with your treatment program.

Best Recovery Strategies for Groin Muscle Strain

✔ Wear Compression Shorts or a Compression Bandage – These reduce swelling and provide muscle support.
✔ Modify Your Physical Activity – Reduce intense exercise, but continue gentle movement to prevent stiffness.
✔ Strengthen Your Core Muscles – Weak abdominal and oblique muscles can contribute to muscle imbalances, increasing the risk of groin injury.
✔ Improve Your Physical Conditioning – Gradually return to normal movement and increase activity levels to prevent reinjury.
✔ Avoid Lifting Heavy Objects Too Soon – Allow your muscle fibers to heal before engaging in strenuous activities.

Watch: The Best Hamstring Stretch for Groin Strain Recovery

This hamstring stretch technique complements IASTM therapy and physical therapy for groin strain recovery by improving flexibility, mobility, and leg motion.

📺 Watch Now: The Best Hamstring Stretch for Recovery

This method helps:

✔ Increase range of motion for better mobility
✔ Prevent muscle imbalances that lead to severe strains
✔ Support active recovery by reducing stiffness

Adding stretching and strengthening exercises to your treatment plan can speed up recovery.

FAQs About Groin Muscle Strains

1. How long does groin muscle strain recovery take?

Recovery time varies:

  • Mild strain – 2-3 weeks
  • Moderate groin strain – 4-8 weeks
  • Severe groin strain – 3-6 months

Using an IASTM tool and physical therapy can significantly speed up recovery time.

2. Can groin muscle strains become long-term issues?

Yes, if left untreated, groin strains can lead to chronic pain, muscle weakness, and difficulty with normal movement.

3. Can an IASTM tool help with neuropathic pain?

Yes, by releasing tight fascia and improving muscle flexibility, it can reduce nerve compression and muscle spasms.

4. Should I wear compression shorts for groin injury recovery?

Yes, compression shorts provide muscle support and pain relief, helping with severe groin pain management.

5. What are the biggest risk factors for groin injuries?

✔ Sudden forceful movements such as sprinting or jumping
✔ Previous injuries that weakened muscle fibers
✔ Muscle imbalances that strain the groin muscles
✔ Improper lifting technique when handling heavy objects

Get Relief Today – Shop the Mobilization Magic™ Tool

Don’t let a groin strain limit your daily activities. The Mobilization Magic™ IASTM Tool is the best treatment for groin muscle strain, helping relieve pain, restore movement, and speed recovery.

🛍️ Get Yours Today & Start Your Recovery


The Fascia in the Groin

Since the fascia in the groin muscle is so strong, it is not a 5-minute job to get the results you want. Experience has shown that you can achieve excellent results with this treatment tool for groin muscle strain. If you spend at least 30 minutes on the tool multiple times during the week, that is. You can stretch the groin in a sideways direction by rotating your foot to one side and moving your body in the same direction. Rock backward and forwards until you feel the tool on the side of the muscle. This will push the muscle in a unique way that’s not possible with other approaches.

Using this tool for groin muscle strain treatment whilst watching TV or doing other things like reading or working on the laptop makes the time pass quickly. A warm muscle stretches much quicker than a cold one, so using a hot pack or taking a hot bath helps a lot.

Caution: If you feel pins and needles or numbness, move the tool to another spot.


Myofascial Release Tool: Everything You Need to Know

Key Takeaways

✔ Myofascial release tools provide deep, sustained pressure to relieve muscle pain, break down fascial restrictions, and enhance recovery.
✔ More effective than foam rolling or massage sticks, these tools precisely target trigger points for muscle soreness relief.
✔ Mobilization Magic™ Tool uses Sideways Stretching™ technology to release tight fascia faster than traditional methods.
✔ Regular use increases blood flow, reduces inflammation, and improves joint mobility, preventing injuries and muscle imbalances.
✔ The tool is ideal for athletes, office workers, older adults, and therapists seeking self-myofascial release for their patients at home.
✔ Cold therapy enhances myofascial release by reducing inflammation and promoting muscle recovery.
✔ Using the Mobilization Magic™ Tool for 5–30 minutes per session can provide long-lasting pain relief and improve flexibility.
✔ Watch the full demonstration video to learn how to properly use the Mobilization Magic™ Tool for maximum effectiveness.

What Are Myofascial Release Tools?

Myofascial release tools are handheld tools designed for pain relief, deep tissue massage, and muscle recovery. These tools work by applying sustained pressure to specific areas, targeting stiff fascia and fascial tissues to break down adhesions and improve muscle health. By increasing blood flow and reducing fascial restrictions and releasing Trigger Points , these tools provide relief from muscle pain and enhance flexibility.

Professional athletes, fitness enthusiasts, and physical therapists use myofascial release therapy to treat myofascial pain, muscle soreness, and chronic pain. Unlike traditional massage therapy, these tools allow for precise targeting of hard-to-reach areas, making them highly effective for self-myofascial release.

Why Use Myofascial Release Tools?

✔ Provides relief from muscle pain and muscle soreness
✔ Breaks down fascial restrictions, painfull Trigger Points  and restores muscle health
✔ Aids in deep tissue massage for myofascial pain treatment
✔ Enhances blood flow to reduce inflammation and speed up muscle recovery
✔ Improves levels of pressure applied to muscle knots
✔ Recommended by massage therapists, physical therapists, and personal trainers
✔ More effective than foam rolling, peanut balls, or massage sticks
✔ Compatible with cold therapy for reducing inflammation
✔ Designed for all body sizes with adjustable levels of intensity


Myofascia has ten times more pain and movement sensors in it compared to muscle tissue, so when it is dysfunctional it causes profound disability and pain. Muscle Trigger Points are a very localised form of myofascial dysfunction. Pain occurs due to pain sensors in the fascia and muscles having stress placed upon them, this stress comes from the tightness and stiffness of the fascia and the accumulation of metabolic waste products due to restricted blood flow.

How Myofascial Release Tools Work

Compared to foam rolling, which covers a larger surface, or massage guns, which rely on vibration settings, myofascial release tools provide deep, sustained pressure on quads muscles, tight muscles, and fascial tissues. This method helps restore balanced body function and relieves painful sensations caused by muscle imbalances and stiff fascia.

Choosing the Right Myofascial Release Tool

When selecting a myofascial release tool, consider the following:
✔ Deep muscle layers require intense pressure for acute muscle release
✔ Larger body sizes may need tools with stronger pressure levels
✔ Portable handheld tools offer convenience for self-myofascial release
✔ Affordable options without compromising deep-tissue massage effectiveness

The Mobilization Magic™ Tool is an effective tool for targeting fascial tissues and stiff fascia, making it ideal for muscle soreness relief and myofascial release therapy.

Understanding Myofascial Release & Connective Tissue

What Is Fascia & Why Does It Matter?

Fascia is the connective tissue membrane that surrounds and supports muscles, bones, and organs. When fascia becomes stiff, it restricts blood flow, increases muscle tension, and leads to chronic pain.

Why Myofascial Release Is Essential

✔ Increases blood circulation, improving muscle health and muscle recovery
✔ Prevents injuries by maintaining joint mobility and flexibility
✔ Releases muscle knots and myofascial trigger points
✔ Helps restore balanced body function and reduces fascial restrictions
✔ Supports soft tissue health, preventing muscle imbalances

According to research by Janet Travell and David Simons (Myofascial Pain and Dysfunction: The Trigger Point Manual), myofascial trigger points are a major cause of referred pain. The Mobilization Magic™ Tool effectively addresses these issues, restoring muscle function and reducing pain.

Unlike foam rollers or massage balls, the Mobilization Magic™ tool delivers focused pressure (25mm diameter, similar to a therapist’s elbow) for deeper relief.

How to Use the Mobilization Magic™ Myofascial Release Tool

The Mobilization Magic™ tool is a professional-grade therapy tool designed for self-myofascial release, muscle health, and pain relief. It is widely used by athletes, massage therapists, and physical therapists to improve joint mobility and treat chronic pain.

Step-by-Step Guide

1️⃣ Identify Your Trigger Points
Locate tight muscles, muscle knots, or fascial restrictions in areas like the quads muscles, hamstrings, lower back, shoulders, and calves.

2️⃣ Position the Tool Correctly

  • Use the tall option for larger muscles such as quads and glutes.
  • Use the short option for hard-to-reach areas like the neck, elbows, or IT band.

3️⃣ Apply Deep Pressure
Gradually shift your body weight onto the tool, adjusting for optimal relief.

4️⃣ Use Sideways Stretching™ for Maximum Effect

  • This therapeutic method, exclusive to Mobilization Magic™, helps release tight fascia faster than traditional tools.
  • It enhances joint mobility and reduces muscle stiffness.
  • Just lay the side of the muscle on the tool so it stretches sideways

5️⃣ Maintain Pressure for Best Results

  • Begin with 5-10 minutes per session and gradually increase to 30 minutes if tolerated.
  • If discomfort arises, reduce the level of intensity and slowly build up pressure over time.

Sideways Stretching ™

One of the important benefits of the MMT (unlike foam rollers, for example) is that it can be used to stretch muscles sideways, instead of lengthways (the conventional way). Sideways stretching is very effective in releasing adhesions and the fascial sheath continuum which surrounds all muscles and ‘sticks’ them to each other. Sideways stretching is particularly effective for muscles such as the Quads, Calf, Groin and Hamstrings.

See our video above for a demonstration of how easy it is to use the tool to achieve this ‘sideways’ stretch with the MMT.

Self Myofascial Release

Self-help is a fast-growing segment of the health industry. People are looking for ways to fix their own problems rather than relying on health professionals to do it for them. The reasons for this are many but the main ones are that people want to take control of their lives and the issues that they face. Reducing the cost of rehabilitating yourself is also a strong motivator. If you’re looking for effective muscle recovery without having to visit a professional, the Mobilization Magic™ self-myofascial release tool is just what you need.

Common Causes of Myofascial Pain

Myofascial pain stems from restricted blood flow, stiff fascia, and metabolic waste accumulation. Fascia contains 10x more pain sensors than muscle, making it a significant pain source.

Trigger points (knots) in muscles are a localized form of myofascial dysfunction, contributing to discomfort and reduced mobility.

Acute muscle pain in the quads muscles causes Knee pain

groin-02
Nick-TO-Hamstrings
hamstrings-Christy
Neck-Video-capture-1024x443
Nick Neck Lateral stretch
Hip Pain Video capture
Shin Splints Video capture
Nick-Quads-Stretch
Nick-Hamstring-Stretch

See more on sideways stretching here

Additional Therapies for Myofascial Release

Combine myofascial release with these treatments for optimal results:

  • Muscle Stretching
  • Posture Training
  • Heat Therapy
  • Cold Therapy
  • Physical Therapy tools
  • Dry Needling
  • Vibration & Ultrasound Therapy
  • PNF Movement Patterns

Why Choose Mobilization Magic™ Over Other Tools?

Many myofascial release tools, like foam rollers & massage guns, lack concentrated pressure because of their large diameters. The Mobilization Magic™ tool offers:

  • Smaller 25mm diameter for targeted deep-tissue release
  • Sustained pressure for long-term fascia stretching
  • Sideways Stretching™ for superior muscle recovery
  • Perfect for trigger point therapy
  • Perfect for Neck Pain – Trigger Point
  • Increase your joint range
  • Take control of your pain management
  • Has a smooth surface that is comfortable to rest on
  • The swiss knife ultimate all-in-one tool

Get your Mobilization Magic Tool here

Watch This Video for a Full Demonstration

For a step-by-step demonstration on how to properly use the Mobilization Magic™ tool, watch this video:

📺 How to Use the Mobilization Magic™ Tool – Full Tutorial

This video covers:✅ Best practices for using the tool✅ How to maximize deep muscle release✅ Tips for targeting different muscle groups

👉 Don’t just read about it—watch the experts demonstrate the technique in action! 🎥

👉 Shop Now & Relieve Pain Today!

FAQs About Myofascial Release Tools

Q: Can I use myofascial release tools daily?

✔ Yes! Daily use enhances muscle recovery, improves blood circulation, and prevents stiff fascia from restricting movement. Using the Mobilization Magic™ Tool consistently can help manage chronic pain and muscle imbalances.

Q: Who should use myofascial release tools?

🔹 Athletes & fitness enthusiasts – For deep tissue massage and muscle soreness relief.
🔹 Office workers – To combat muscle tension from prolonged sitting.
🔹 Older adults – To improve joint mobility and prevent stiff fascia.
🔹 Massage therapists & physical therapists – For targeted pain relief techniques at         home and the office.

Q: How does myofascial release compare to foam rolling?

🔹 Foam rollers provide surface-level relief, while myofascial release tools deliver deep, targeted pressure.
🔹 Massage balls and peanut balls focus on small trigger points but lack sustained pressure.
🔹 The Mobilization Magic™ Tool is an effective tool for myofascial release therapy, offering levels of intensity adjustable for muscle soreness relief.

Q: Does cold therapy enhance myofascial release?

✔ Yes! Cold therapy helps reduce inflammation, making it an excellent therapeutic method for trigger point therapy. Alternating between cold therapy and deep pressure massage can speed up muscle recovery.

Q: What makes the Mobilization Magic™ Tool unique?

Unlike massage guns, foam rollers, or massage sticks, the Mobilization Magic™ tool provides:
✅ Deep tissue massage with levels of pressure suited for muscle recovery
✅ Designed for self-myofascial release at home
✅ Sideways Stretching™ technology, which foam rollers lack

Take Control of Your Recovery Today!

If you’re tired of chronic pain, muscle tightness, or reduced mobility, the Mobilization Magic™ tool is the effective tool you need for myofascial release therapy, muscle health, and pain relief.

🔹 Get the #1 Myofascial Release Tool Today!
🔹 Try it risk-free for 60 days – or get your money back!

👉 Shop Now & Relieve Pain Today!

References & Scientific Studies:

Get Relief Today Shop Now


Amazon


Best Trigger Point Massage Tools

Trigger point massage tools help resolve problems with muscles that account for a very large proportion of the chronic myofascial pain people suffer all over the world. Muscles develop what people call knots, or myofascial trigger points, which can cause myofascial pain syndrome and dysfunction, which are small, local concentrations of electrical activity that can be detected by scientific instruments.

Myofascial Trigger Points TP display a typical pattern of localised tenderness and a tense band of shortened and weak fibres. Myofascial Trigger Points TP start with a muscle strain and becomes a site of sensitized nerves, increased metabolism and reduced blood flow. If left untreated it will become an area of scar tissue that does not stretch anymore and if there are enough of these trigger points, then the muscle will not function properly and cause ongoing problems. This often leads to myofascial pain in nearby joints and referred pain to other areas of the body. You feel the pain in one area, but the problem is in another area and so if you apply pain cream, heat, cold or massage to the area of myofascial pain it does not fix the pain because the problem is elsewhere. see the images to the right that show the referred pain areas.

trigger-point-shoulder
trigger-point-lower-arm
trigger-point-leg-calf
trigger-point-hamstring
trigger-point-back
trigger-point-arm

Trigger Point Therapy reduces myofascial pain at the location of the trigger point but also the referred pain away from the trigger point, increases movement, and allows the muscles to lengthen and become stronger. To treat Myofascial Trigger Points, enough pressure needs to be applied to the muscle to reach the TP which are often deep in the muscle and deactivate the electrical activity and unblock the blood flow again. Unfortunately foam rollers cannot produce the concentrated force required to treat and break up Trigger Points because of their large radii. That’s why the Mobilization Magic™ trigger point massage tool works so well with Myofascial Trigger Points.

Trigger Point Massage Tools

Pressure and Time make Diamonds and Happy Muscles

The reason this Trigger Point Massage Tool works so well is that it works on a material science concept called creep. Creep describes where a material has a concentrated force applied to it over time and that material yields to that force, an example of creep is when the gas spring of an office chair pushed through the   5 star base and drags on the floor. The gas spring crept through the base, just like the MMT tool creeps through your problem muscle like nothing else can and allows it to heal itself. https://en.wikipedia.org/wiki/Creep_(deformation)#Examples

In 1983, Janet Travell & David Simons, published a book on Myofascial Trigger Point treatment that revolutionised the treatment of myofascial pain and forms the basis of how they found that Trigger Points occur at the point where a nerve enters a muscle. Trigger Points result in muscles which have been stressed by accidents, sports, occupational stress, and overuse. Once a Trigger Point develops, it can remain for life unless properly treated. The Myofascial Trigger Point restricts range of motion of the muscles and decreases blood flow, reducing nutrients and oxygen to the muscle. This in turn causes a build-up of  waste products including lactic acid, these chemicals stimulate pain nerve endings making them more sensitive, creating a vicious cycle that damages the nerve and muscle tissue and increases your pain and makes the muscle shorter and tighter.

These effects are not confined to the local muscle as tight contracted muscles can compress nerves and blood vessels causing sensations like throbbing, burning, numbness, pins & needles, coldness and swelling of upper and lower limbs.

Pressure applied to the Myofascial Trigger Point is called Ischemic Compression, Acupressure, Shiatzu and the Magic Elbow by some Chinese masseuses. Normal muscles do not contain Trigger Points, nor do they have taut bands of muscle fibers, are not tender to firm pressure, exhibit no local twitch responses and do not refer pain to other areas in response to firm pressure. Women are statistically more vulnerable to Trigger Points than men. There are two different types of stimuli that activate Trigger Points. Firstly there are direct stimuli like acute overload (unusual exercise), overwork fatigue (Shoulder/Neck and Lower Back muscles)  chilling or gross trauma. Secondly there is indirect stimuli like other Trigger Points, visceral disease, arthritic joints and emotional stress.

The reason the Myofascial Trigger Point and the pain that is felt are often in different areas is not completely understood, it does have to do with the fact that nerves in muscles are part of a nerve distribution area like a tree which is serviced by a spinal segment in your spinal cord. The spinal cord segment is like a little computer and interprets the signal from Trigger Points before it sends it to the brain and in that process your brain interprets the pain being in a different location within the nerve distribution.

Using the Trigger Point Massage Tool

When using the trigger point therapy tool on a new spot only use it for a minute or so to see if it increases your myofascial pain for longer than a few minutes and reduce the pressure exerted by the roller or trigger point therapy tool by placing pillows or towels on top of or either side of these tools. If there is no sustained increase in pain after a few hours slowly increase the amount of time by a few minutes each time you use the tool. If you feel this spot is the centre of where you feel tightness and pain, you can spend 30 minutes or more on that spot until the tool melts deeply into the muscle and releases the trigger point and muscle fascia. Hot packs or even better hot baths greatly improve the effectiveness of these techniques as warm/ hot muscle stretch and give way more easily.

The beauty of this trigger point therapy tool is within your tolerance you can eventually lay on this tool for 30 minutes or more which penetrates deeply into the muscles in a gentle way. You will feel it slowly sink into the muscle over time as the tissues yield to the pressure. No other approach I know of enables you to put the right amount of pressure on these trigger points and very tight muscles for extended periods of time which is what they need to reverse the problems of many years.

You will get accustomed to this pressure quickly and so the way to progress this procedure is to use the trigger point massage tool in its tall option, which increases the pressure the tool exerts. Again, start this new use with only a few minutes to start with to ensure there is no increase in myofascial pain.

Always stretch the muscle before and after using the tool, notice if there is any increase in range of movement after using the trigger point massage tool ?

Trigger Point Therapy Roller Exercises

Foam Rollers are used all over the world to treat Trigger Points TPs and tight fascia, unfortunately foam rollers cannot produce the concentrated force required to treat and break up TPs because of their large diameter. Foam Rollers have a 150 mm diameter which produces a diffuse pressure that can increase pain by stirring up the nerves in the area and increase muscle spasms. Therapists use their elbow or thumb to treat TP’s and apply enough force to increase the pain initially but as the pressure is continued to be applied the pain melts away and the dysfunctional biology returns to normal.

Pain and tightness in muscles and connective tissue at the front, back and side of joints can cause pain and reduced range of movement of the joint.

Conventional stretching of these muscles has some effect on the pain and restricted range of the joint, but this can only help to a limited extent because stretching tends to stretch the parts of the muscle that are not constrained and stuck down by adhesions that develop around a tight painful muscle.

Getting Started with Trigger Point Therapy

Step 1

It is recommended that you take a hot bath or apply a hot pack to the affected area before you begin using the tool. Warm muscles stretch and give way more easily and this will greatly improve the tool’s effectiveness.

Step 2

Lay the muscle or joint onto the tool. Rate the pain you feel while using the tool from 1 to 10 (with 1 being the least pain and 10 being the greatest). Your pain when resting on the tool should not be more than 4-5.

Step 3

If your pain is greater than 5, place a towel or a cushion over the tool, or on either side of it, to reduce the amount of pressure, which should reduce the pain to a level of 5 or below.

Step 4

When you feel the position of the tool is in the correct central point where you feel tightness and pain, you can start off laying on the tool for a few minutes to make sure the tool does not increase your pain. If after a few hours rest everything is ok you can start increasing the time on the tool. Once you are comfortable with the tool you can spend 30 minutes or more resting on that same spot (watching TV or reading) until the tool melts deeply into the muscle or joint and releases that trigger point and muscle fascia

Step 5

The pain should begin to decrease within the first couple of minutes and continue to reduce as time goes on. If you notice no improvement within about five minutes, the muscle or joint may be too inflamed and may require the application of an ice pack. Try again later.
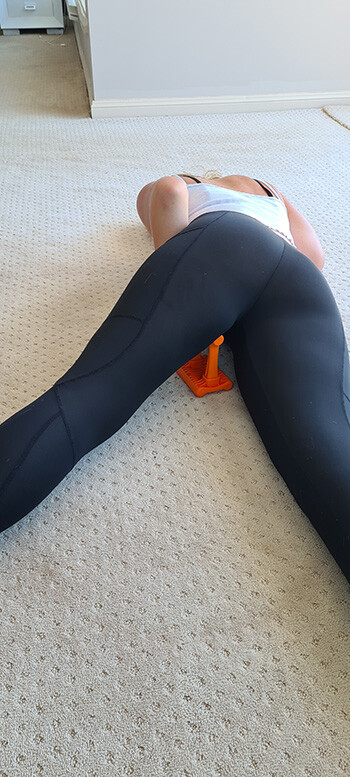


This IASTM tool is the only one to use full body weight

Only use the short option on the side of your leg on the TFL & ITB. Drape towels over the tool to reduce the amount of pressure it produces until you get used to it.

TFL Video capture

The MM tool works very well on loosening up the very tight fascia that normally causes tightness, pain, and disability in the TFL, ITB, and knee. Use the short option depending on where your problem is to start with. Make sure you put a towel on either side of the fascia massage tool, as the pressure in this area is very intense. Bend and flex your knee to floss the muscle if that feels good. Make sure you put the tool close to the knee and near the hip, as these areas often are an issue. Roll the leg and your body to the left and the right to see where the pain is greatest. Put the tool under the problem area for a minute or so. If there are no issues, slowly increase the amount of time on the tool to make sure your TFL tolerates this pressure.

How to get the best results treating TFL & ITB Fascia

Since the fascia in the TFL and ITB is so strong, it is not a 5-minute job to get the results you want. Experience has shown that you can achieve excellent results with the Mobilization Magic™ fascia massage tool—if you spend at least 20-30 minutes on the tool multiple times during the week, that is.

Rotate your foot to one side and move your body in the same direction for an effective ITB and TEFL muscle stretch in a sideways direction. Rock backwards and forwards until you feel the tool on the side of the TFL. This will push the TFL in a unique way that’s not possible with other approaches.

Using this fascia massage tool whilst watching TV or doing other things like reading or working on the laptop makes the time pass quickly. A warm muscle stretches much quicker than a cold one, so using a hot pack or taking a hot bath helps a lot.


This IASTM Tool relieves foot painblank

Sit on chair and place your foot on the tool. The ligaments in the foot can produce a variety of problems that interfere with your walking and running and produce pain in the heel and in the front of the foot. They are also responsible for the height of your arch and so a very tight ligament will produce a high arch. If you lay the sole of your foot on the short option of the tool you will be able to find sore or tight areas that need attention. Start gently as the tool can produce a lot of force and a bruised foot will not help you much. These ligaments can produce what is called a calcaneal spur which is a bony growth associated with the foot ligament. Move the tool around until you find the sorest spot and leave the tool there until the pain decreases. Don’t push too hard as you can injury your self if you do.


This Is the No 1 IASTM Tool used at Home

Instrument-Assisted Soft Tissue Mobilization IASTM tools are instruments used by therapists for fascia soft-tissue mobilization.

blankThis Mobilization Magic IASTM tool is Australia-made and Designed by an Award Winning Physical Therapist.

These tools are usually operated by a professional therapist because it is not possible to use IASTM tools that are normally associated with IASTM treatment on yourself easily. The Mobilization Magic soft tissue mobilization tool allows you to mobilize yourself in the comfort of your home.

How to use these Mobilization IASTM tools?

All you have to do is lay on the MMT tool for successively longer periods of time up to 30 mins so gravity, your body weight and time releases trigger points, the fascia and connective tissue (CT) in the skin and the underlying muscle as seen in the image right. By stretching the fascia you will increase your range of motion and be able to do things you have not been able to do for years.

Muscles have a cartilaginous/fascia skeleton that runs down the core of it, seen in the diagram below. It is difficult to stretch this skeleton by other approaches but using this MMT tool especially in sideways stretches works very well in bending the fibres in a direction that breaks up stiffness and adhesions.

hamstring pain reliefhamstring pain relief

headache orange circlegroin stretchgolfers elbow


How this IASTM Therapy Tool works

This soft tissue mobilization tool effectively breaks down fascial restrictions and scar tissue. The introduction of sustained pressure to affected soft tissue causes the stimulation of local inflammatory response. The microtrauma that pressure causes starts a reabsorption process of fibrotic tissue or excessive scar tissue and promotes a chain of healing activities resulting in normalizing the affected soft tissue. Adhesions within the soft tissue which may have developed as a result of surgery, immobilization, repeated strain or other mechanisms, are broken down allowing full functional restoration to occur.

Our IASTM Therapy Tools stimulate:

  • A flexible and well-maintained, healthy fascial network.
  • Improved (soft) tissue perfusion.
  • Improved range of motion.
  • Mobilization of the soft tissue fascia.
  • Loosening of adhesions in the connective tissue.
  • Treatment of trigger points.

The most common conditions Mobilization Magic IASTM Tools are used for:

  • Back Pain
  • Hip Pain
  • Plantar fasciitis
  • Neck Pain & Headaches
  • Heel Pain /Achilles Tendinitis
  • Patella tendonitis
  • Adhesive Capsulitis
  • Tennis/Golfer’s Elbow
  • Carpal Tunnel Syndrome
  • Iliotibial Band Friction Syndrome
  • Surgical or Traumatic scars
  • Ligament Sprains
  • Non-Acute Bursitis
  •  RSD (Reflex Sympathetic Dystrophy)
  • Muscle Strains and tightness
  • Shin Splints
  • Delayed Onset Muscle Soreness (DOMS)

Frequently Asked Questions

Q Is IASTM Therapy safe?

A Yes, IASTM Therapy has been used world wide for over 100 years with no reported adverse reactions to it. There are some reasons (Contra-indications) to not use it which can be found here.

Q What is Fascia?

A Fascia is the glue that holds our bodies together. All the forces that our bodies experience are transmitted by the fascia, without fascia we are just a pile on bones. See Fascia Facts